Showing posts with label diy. Show all posts

October 24, 2023

DIY Girly Haunted House Halloween Decor Craft for Kids to Make

We've been getting crafty around here.

There's just something about Halloween and this time of the year that leaves me feeling inspired! I can't be the only one who loves this time of the year and absolutely can't wait to embrace all things fall! Right?

Are you also excited for spooky season? I know we certainly are stoked to celebrate and my oldest is legit counting down the minutes until it's time to go trick-or-treat! To help pass the time, her and I decided to get crafty this week and make a bunch of adorable new spook-tastic decor for our house! This little girly haunted house project is probably one of the easiest projects we've ever made and great for kids to craft up, almost completely alone (especially if you opt for Elmer's instead of hot glue).

If you're feeling the spirit of the season and you'd like to make your own cute, girly little haunted house, here's the details on how we made ours.

It's that time of year again and we're so stoked to be crafting up some adorable, girly halloween decor! Want to make your own? Here's how!


Supplies you'll need:

These Jumbo Popsicle Sticks from Walmart
Orange Paint
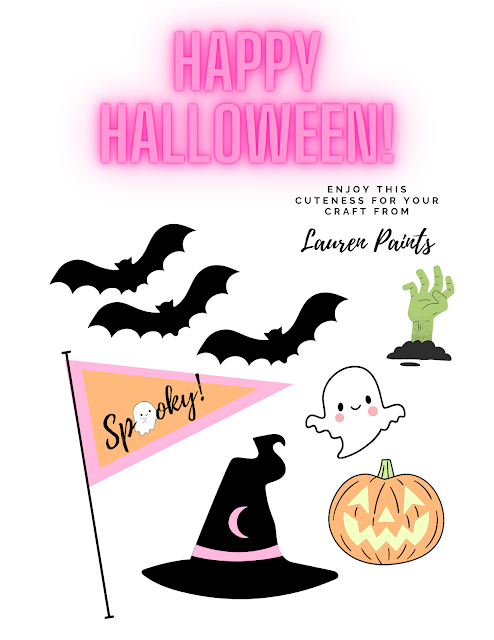
This printable I crafted up
Hot glue &/or Elmer's glue
Glitter Paper
Scissors
Beads & Pipe cleaner are optional for "added flair", you could always just use a marker instead!

We started by gluing this beauty together, then cut out all of our cuteness from the printable.

Next, we glued our glitter paper on to the back and painted our house orange.

Finally, we glued down all the little details like my printable pieces, beads, and pipe cleaner. If you decided not to include the optional flair, you could easily just draw on a door!

And just like that, you've got an adorable addition to your Halloween decor! We placed ours just above the front door and it's so perfect!


Are you more of a visual person? Check out this quick tiktok to see how we made the haunted house!


November 3, 2021

Silly and Cute Thanksgiving Turkey Guided Drawing

 My little gal is constantly making art and sharing her creative ideas with us, from checking out "how-to-draw" books from the library to making her own story books and secret notes for us.  I'm always so impressed with her creative side and I do all I can to nurture that.


Lately she's been asking me how to spell new words and draw certain things so I figured we would do a guided drawing to celebrate the beginning of November.

These cute turkey friends made her giggle as we drew them and were super easy to create. Just a few minutes of drawing and a fun time coloring and we have some thanksgiving decorations to add to our fridge.

Want to draw with us? Here's our step by step:


Want more craft inspiration for the holidays? Be sure to subscribe to the blog!


December 18, 2020

Simple, Stylish Paint Chip Christmas Tree Toddler + Kid Craft


The holidays are right around the corner and we are super excited about all the fun that involves... this year is going to be one of the best. I haven't share this yet, but we have family surprising Delainey with a long visit over the holidays so it's hard not to be stoked. Also, I'm pretty amped to see her face on Christmas morning, because I may have spoiled my sweet girl. Beyond that, the Christmas spirit is in full swing in our home - with our little Elf causing trouble and the sweet innocence of writing letters to Santa, I'm going to go ahead and call it, Christmas is truly the most wonderful time of the year!

With that said, we've been trying to keep busy lately as we countdown the days until Christmas and this super simple and FREE Paint Chip Christmas Tree Craft was the perfect way to keep our minds occupied while creating a masterpiece. It was also a great way to practice cutting and gluing skills and to encourage her to discuss colors and shapes.

I also loved that we were able to make our tree anything but green. She's been stuck on trees only being green and it was good to encourage her imagination and mix up colors!

Have a little crafter on your hands? Love the look of our simple paint chip trees? Want to make one of your own? Here ya go!


We grabbed our paint chips for an upcoming rainbow mural project in her room from our local hardware store and well, we decided to use them craft-ily as well once this idea came to mind.

You'll start by cutting off both ends with writing on them and start making staggered cuts with the remainder of the paint chip. Allowing for both big and small pieces, thick and thin,etc.

Now, once you have a ton of colors cut up and lots of variety in the shapes of your pieces, apply glue to your white paper in the shop of a tree, if you'd like you can top your tree with a star or a funky shaped cut.


It's that easy. Now just let it dry & hang it up! I plan on sticking these in shadow box frames and setting it out each year. I love looking back at our crafts year after year and admiring each piece, it's a little bit of nostalgia that I'll always be thankful for.

Do you love doing holiday crafts? Be sure to subscribe to receive our blog updates so you don't miss a thing!


November 30, 2020

Simple Snowman Countdown to Christmas Chain


This month I'm taking more time to embrace the little moments with my growing girl. After a year of running on overdrive for my small shop, I stepped back around Thanksgiving and realized I owe it to both of us to spend more quality time together, so we've been laughing more, cuddling tons, and doing non-stop craft projects. I thought I'd start to share our daily craft projects and hopefully inspire you to get your hands messy with your little one!


Today I'm sharing a super simple, yet adorable craft - our Snowman Countdown to Christmas Chain is something nearly everyone has the materials to make and it's such a fun way to visually show your kids how many days are left until Christmas. I highly recommend pinning this project and getting it completed early in December so that it's a fun, drawn out countdown! We started our countdown with 26 days left until Christmas and I'm so excited to watch D's face as the links go away and she realizes Christmas is almost here!

Ready to start making your Snowman Countdown to Christmas Chain? Let's do this!


Materials:
White Printer Paper
Glue
Scissors
Black Construction Paper
Markers

You'll start by cutting the white printer paper into the amount of days you are counting down... we started at 26 days so cut out 26 pieces of paper.

We then made one into a circle, gluing the ends together. Then continued that process, having Delainey help thread each piece through the next and place the glued ends together. Continue connecting until you have only one piece remaining.


Once we had all of our pieces of connected, sans one. We drew a cute snowman face on the last piece, threaded it through, and attached the ends.

We then cut out a little hat and attached with glue.

The final step was showing off our hard work and hanging it up so we could start counting down the days until Christmas!


Have you made a countdown or are you using a pre-purchased advent calendar? Tell me all about how you're counting down the days until Christmas in the comments below!


June 13, 2020

The BEST Way to Make Homemade Bubbles


This year we've spent a ton of time at home, like many people. That means we've been trying to find ways to keep our little wild child occupied... and that involves lots of time spent outdoors, chasing bubbles through our backyard and sometimes even having competitions to see who can make the biggest bubbles.


We used to be the type to buy bubbles from the store...then we experimented and started making our own. Want to make your own...? Here's how:


February 6, 2020

Creative and Cheap Valentine Inspiration: Being Your Valentine is a Piece of Cake Valentine Freebie Printable

This post contains affiliate links, that just means I make a small commission if you decide to buy after clicking through on my link. It doesn't charge you anything, but allows me to help my family!

Getting ready for Valentine's Day last minute this year? Here's a super cute Valentine idea for anyone in your life and it's a "piece of cake" to prepare - grab this printable and a squishy from Dollar Tree (or even a cupcake from the grocery store) and leave this on your Valentine's table.


I love this cute valentine piece of cake squishy for so many reasons - I mean, it's adorable, so there's that - but it's also a great "stress reliever" and it's a clever way to remind someone you are thinking of them. It's truly a multi-functional valentine in many ways.


The best part of this little Valentine though, was The Dollar Store had so many different options! I loved that they had a million different cake squishies, that way you could give each teacher in your kiddos life one of these or even leave them on the secretaries desks at your work with THIS free printable.

https://drive.google.com/open?id=1S8qu3GA8DBHAtqp_kz9vCGmMwk-BUqJU


If being with your Valentine is a piece of cake - then you absolutely need to give these out this year!

FREE PRINTABLE CAN BE FOUND HERE!