Showing posts with label tutorial. Show all posts

November 17, 2014

DIY Pampering At Home Pedicure with Amopé Pedi Perfect and a Pineapple Coconut Soak

This shop has been compensated by Collective Bias, Inc. and its advertiser. All opinions are mine alone. #RespectUrFeet #CollectiveBias


I've always tried to pamper my feet and pedicures are probably one of my favorite activities, ever... and since I really don't like feet (I'm weird, I know), I feel like having pretty feet makes them a little less ugly and weird looking. Having dry or cracking feet is a big no-no in my book, cracked polish on your big toe - UH, no! Even though it's fall and we all plan on rocking boots and closed toed shoes, it's still important to have your feet looking good when the socks come off! Instead of hitting the salon weekly, I've finally found a new way to get my super pampering pedis in at home!


I found this little gadget at Target and I was so excited I headed home and decided it was time for a spa day immediately! I applied a face mask, got the polish out, poured some pineapple and coconut juice (not for drinking, read on for a super fun pedicure tip) and it's pedicure time!


I recently heard that pineapple is good for your nails; it sounds a little crazy, I know, but I did a little research and decided to start my pedi with a fabulous, all-natural pineapple, coconut soak. Pineapple stimulates the production of anti-inflammatory properties and contains chemicals that prevent tumors according to The Doctors; while coconut helps moisturize stubborn skin and it's anti-aging properties revitalize skin. Oh and did you know coconut milk can also serve as a make up remover, conditioner, and more?

So now that you know what this delicious smelling footie cocktail will do for you, it's time to mix it up and let your feet dive in.


Mix together 3 cups of Organic Pineapple Juice, around 1 1/2 cups coconut milk, and around 4-5 cups of hot (warm) water. Stir this mixture together inside a deep container and place your feet in the soak. I allowed my feet to soak for around 10 minutes, letting the pineapple soften my cuticles and brighten my nails while the coconut milk softened my skin. You will really notice a difference when removing your feet from the mixture.

After soaking, dry your feet with a towel and push back cuticles.


Next on the line up is the star of the show, the Amopé Pedi Perfect is what I use to buff the dry skin and callouses from my feet. This easy to use gadget is what makes my at home pedis so much better than one at the spa. I'm able to buff away the rough spots on my feet with the specially designed Micraumina head without it being painful or too aggressive. I'm obsessed with how soft and healthy my feet feel after use, especially after I applied the Amopé foot cream.


If you're looking for a way to spoil yourself or your closest gal pal, I highly suggest you #RespectUrFeet and pamper both of you with an Amopé Pedi Perfect. You can find this new at home pedicure gadget at Target in the foot care aisle. Plus right now through the 11/22 you can score a $5 gift card and 10% off using the Target Cartwheel app.


The last step in this super pampering pedicure is getting creative with polish! I decided to paint my toes with a super fun Fall inspired pedi and I'm sharing a simple tutorial on how I painted these super cool leaves onto my toesies. 


My Secret to The Perfect Bombshell Blow Out with Conair Curl Secret and Pro 3Q

This shop has been compensated by Collective Bias, Inc. and its advertiser. All opinions are mine alone. #CollectiveBias #HeartMyHair

I've always longed for the Perfect Bombshell Blow Out and with naturally curly hair, it's never been easy to achieve. I'm so excited to share that I have finally found the secret to the perfect bombshell blow out hairstyle everyday: the Infiniti Pro by Conair® Curl Secret® uses tourmaline-ceramic technology to help reduce the amount of frizz in your hair, while leaving you with super soft, touchable curls. This innovative tool is like nothing you have ever used before for your hair and the curls it makes are AMAZING!

Instead of keeping the Curl Secret to myself, I'm sharing it with the world. Take note, I found the Infiniti Pro by Conair® 3Q™ Brushless Motor Dryer and the Infiniti Pro by Conair® Curl Secret® at Wal-Mart...


Both of these items are this years hottest hairstyling products, in my opinion, and you can guarantee that The Curl Secret and Pro 3Q will be on every female's Christmas wish list!


Wondering how I achieved The Perfect Bombshell Blow Out? There's a technique necessary to achieve the perfect blow out and today I'm sharing my tips and tricks:

You'll want to begin by washing and using a deep conditioner, then towel dry your hair.
Begin an initial blow dry using your Pro 3Q, allowing your hair to become around 85% dry. Luckily with this dryer this process is quick and easy!

Now apply heat protection products, moisturizing products, and any other products you use regularly when applying heat to your hair.

Next you'll need to section off the top half of your hair and finish drying, using a round brush to help you shape and straighten your hair from the roots while providing volume without adding frizz!

Now that your hair is mostly straight, use the Velvet Paddle Brush to brush out tangles and turn on your Infiniti Pro by Conair® Curl Secret®. Now the real fun can begin!

You'll need to separate your hair into sections sized about 1-1 1/2 inches and allow the Curl Secret to draw your hair into it's chamber and wait for the "beep" indicating your hair is curled. This amazing hairstyling tool makes perfect, luxurious curls every single time! Continue curling over your entire head.

Once all of your hair is curled, brush your hands through. If you happen to have a clip run this through, breaking up the curls. This will help loosen your curls and give you more of the bombshell look over the Taylor Swift curls. I decided to go ahead and pin some of my bangs back with a bobby pin so I could really show off my curls.

Now finish with hairspray and your hairstyle is complete!


Do actions speak louder than words for you? Check out my quick tutorial on how I use the
Infiniti Pro by Conair® 3Q™ Brushless Motor Dryer and the Infiniti Pro by Conair® Curl Secret® to get achieve the coveted Bombshell Blow Out look!


Stay Connected with Conair: Facebook | Youtube | Pinterest | Twitter

November 10, 2014

Pumpkin Spice Frappé Coffee & Crafting Date with a DIY Office Calendar Tutorial

I am a member of the Collective Bias®  Social Fabric® Community.  This shop has been compensated as part of a social shopper amplification for Collective Bias and its advertiser. #CollectiveBias #Feast4all


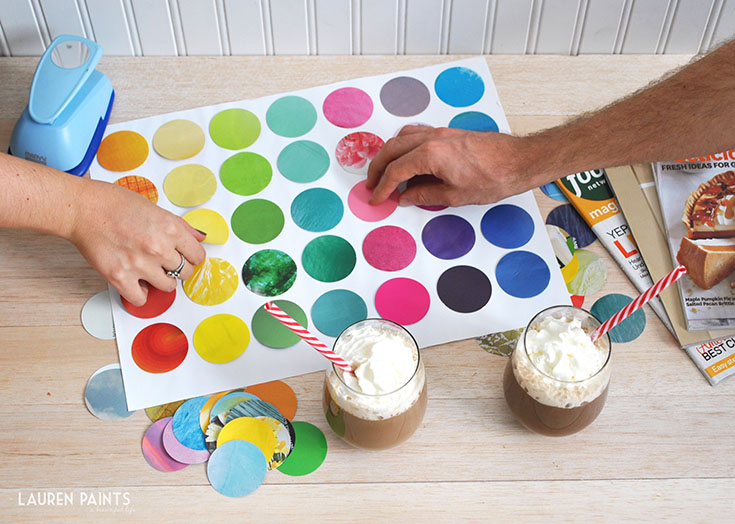
I told you about my office project earlier this week and how much fun hubby and I are having putting it together. It's been a blast gathering materials and trying to design them in a way that really fits our style and our tiny town home, you can check out how the office turned out here. We love taking on creative projects so I decided I'd make one of our weekend morning's together a little more fun by putting together a coffee and crafting date. I really wanted to set the "coffee house" vibe at home so I decided to take a trip to Walmart and bought the supplies we needed to make pumpkin spice coffee (frappés to be exact)!


I was feeling especially fancy and decided to share a video of our adventure to Walmart too:

After I got everything I needed, we headed home and set up our craft station, I turned Pandora to an acoustic station, and poured us the most delicious Pumpkin Spice Frappé Coffee thanks to NESTLÉ® COFFEE-MATE® Liquid Coffee Creamer in Pumpkin Spice and NESCAFÉ® Tasters Choice® House Blend, you can find my recipe below. We topped these off with a good dose of whip, just the same as they would at a coffee shop and got to work.


Interested in making a Pumpkin Spice Latte or Frappé at home?
Enjoy a flavorful moment of your own.


#fallrecipes #pumpkinrecipes #coffee #pumpkin #thanksgiving #cbias #ad #crafting #date #DIY


Pumpkin Spice Frappé Coffee Recipe

 Ingredients:
 NESTLÉ® COFFEE-MATE® Liquid Coffee Creamer in Pumpkin Spice
 NESCAFÉ® Tasters Choice® House Blend
 Ice Cubes
 Water
 Sugar or Sugar substitute (to taste)

 You can make a super yummy frappé at home with just a few simple items and your blender!

 Begin by adding the correct amount of Tasters Choice coffee and water (as instructed on package)   and about 3-4 ice cubes into your blender. Blend until it begins to foam a bit. Pour into a glass and sugar and NESTLÉ® COFFEE-MATE® Liquid Coffee Creamer in Pumpkin Spice to taste, garnish with whipped cream! I meant to add a dash of pumpkin spice seasoning over the whip as well but the coffee were so good, I just forgot and started sipping!

Want to make a PSL instead? Just switch the coffee out for espresso!

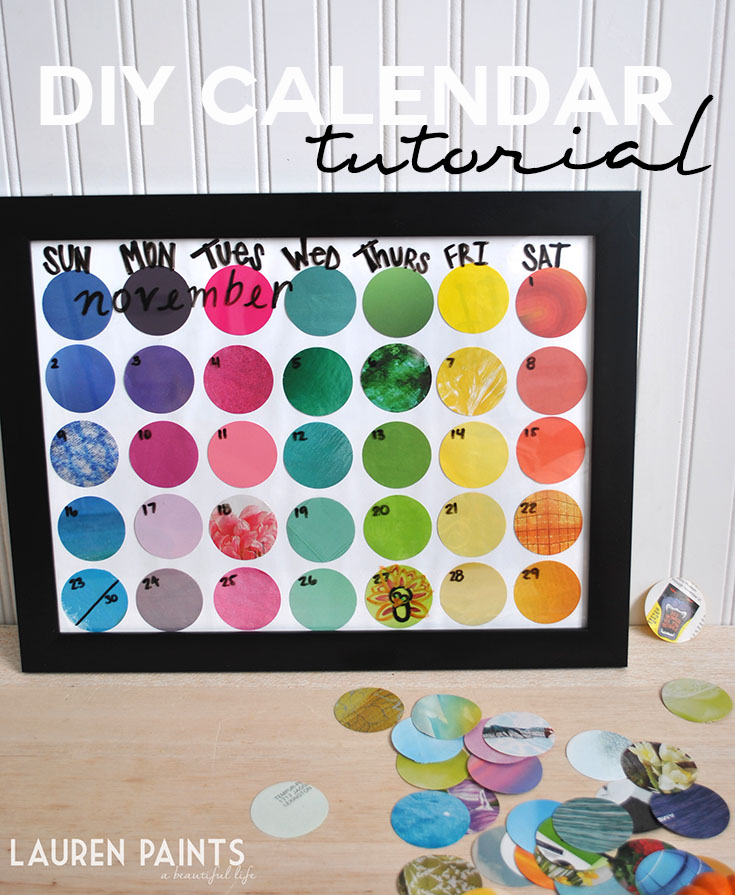
Now that we have your caffeine fix satisfied, let's get to the crafty fun from our coffee date. I absolutely love how my calendar turned out and since it's such an easy project, I hope that some of you will decide to add one of these beauties to your home.

#fallrecipes #pumpkinrecipes #coffee #pumpkin #thanksgiving #cbias #ad #crafting #date #DIY

The best part about these calendars is that you can customize them completely. If you only like shades of blue and green, then make it only those colors! If you are trying to make a calendar to help your kids learn the days of the week, this would be a fun and playful way to get them involved in calendar building. Do you need a super girly chore chart for your little princess, make one! There are so many other uses for these boards - from art work to grocery lists, you can write anything on them!

#fallrecipes #pumpkinrecipes #coffee #pumpkin #thanksgiving #cbias #ad #crafting #date #DIY


DIY Calendar/Organization Board


 For this project, you will need:
 A giant hole punch  (scrapbooking supplies aisle)
 Magazines (paint swatches work as well)
 A large frame with the glass
 Scrapbooking Photo Stickers

 You may also need*:
 White poster board
 Scissors
(*I was lucky and frame happened to have the stock photo still, I just flipped it over and used the white side as my background for my calendar... if you don't have that option, I suggest using poster board trimmed to the size of your frame instead!)
#fallrecipes #pumpkinrecipes #coffee #pumpkin #thanksgiving #cbias #ad #crafting #date #DIY


This project is all about getting creative. If you are using magazines, you'll need to find photos that have patterns you love or spaces of just color without words. If you are using paint swatches, just begin hole punching the colors you want to use. Note that you'll need 35 circles total if you are making a calendar, if you want to make a "waterfall" organization board as shown in my office picture - just get to hole punching and count later!

I should also mention the downside of using magazines is that they don't cut as easily with the hole punch as the paint swatches do. With that said, I've found that if I hole punch the magazine clipping with one of the stock paper "mail this in to subscribe" post cards as well, it makes the process much easier. You can see the technique I use showcased below.

#fallrecipes #pumpkinrecipes #coffee #pumpkin #thanksgiving #cbias #ad #crafting #date #DIY

After getting all your dots cut out, arrange them on your background and use small scrapbooking mounting stickers to hold the dots in place. It's easier to line them up if you use something like a ruler or a piece of paper to help make sure your lines are even. You can arrange your dots however your heart desires, for my calendar I did a semi-ombre effect with my dots and love how it turned out... but then I made my "waterfall" organization board and I love it even more. The possibilities are endless with this project!

After getting it all organized, place it all together in frame behind the glass, hang your frame, & get to writing!

#fallrecipes #pumpkinrecipes #coffee #pumpkin #thanksgiving #cbias #ad #crafting #date #DIY

We had a blast on our "coffee date", we even laughed our butts off while trying to hang the picture because these stinkin' frames would NOT stay on the wall. We ended up buying some sticky wall hangers to help keep them up but the whole ordeal made for a really good belly laugh... It actually all reminded me of when I first met my husband: The belly laughs, crafting, and coffee dates just like when we were kids and first started dating. The day was perfect and I'm so thankful to have a spouse like mine. Want to have a coffee and crafting date of your own? Use my recipe and tutorial and surprise your sweetie with a fun date today!


#fallrecipes #pumpkinrecipes #coffee #pumpkin #thanksgiving #cbias #ad #crafting #date #DIY

August 1, 2014

How to Create a Custom 404 Error Page - Lauren Paints | a beautiful life Blogger Tutorial Series

No one wants to find an error page, on any website,
but it happens on occasion.

Whenever a reader finds a link that no longer exists,
your blog most likely sends them to a typical error page that looks similar to this:
Simple 404 Error Page


With a custom 404 error page, you can add several features on the 404 error pages that make them more user-friendly and interactive. You can customize the page by giving the reader the option to contact you, to go to the home page, and more.
 I decided I wanted to spice things up so I'm changing how my error page looks. I figured I'd write up a simple tutorial to help my fellow blogger friends out if they want to do the same.

Follow the steps below to make your own custom 404 error page!
How to Create a Custom 404 Error Page

Let's get this party started:


1. Go to Your Blogger profile, click "Settings" on the side bar,
then "Search Preferences".
How to Create a Custom 404 Error Page


2. Scroll to find "Custom Page Not Found"
under "Errors and Redirection".
How to Create a Custom 404 Error Page


3. In another window, create a new post 
and use the HTML editor to create the HTML for the error page { do not publish at any point. }
You can just type in something funny and format it as you please,
custom design a graphic, the possibilities here are endless!
Get creative and make it your own.
Now click the HTML tab in the corner and Select all + Copy!

How to Create a Custom 404 Error Page

I custom designed a graphic in photoshop, uploaded it onto photobucket,  then used image mapping to make the links clickable.
{That's a whole different tutorial that I'll be posting soon.}
 

4. Paste the code into the "Custom Page Not Found" box and save.
How to Create a Custom 404 Error Page

5. Now test out your link and make sure it works:
Just type "YourSite".com/404 into your address bar.
How to Create a Custom 404 Error Page


October 13, 2013

Super Simple + Inexpensive DIY Gallery Wall {Thrifty Finds}


Although my gallery wall isn't complete,
I decided I just HAD to share my progress thus far.
 {I think it may always be a work in progress}
This was a super easy project,
that ANYONE can do.

I got a little thrifty with my wall,
I went poppin' tags and even found one gorgeous frame in the trash...
but you could also use brand spankin' new frames.
I was aiming for a very eclectic look and totally think I achieved what I wanted.


 I bought the silver pieces for an older project in another room that I've grown tired of
 and spray painted them long before taking pictures. 
The canvas prints were super simple to make,
I just placed a doily partially over the canvas and spray painted them.
{The before picture of some of the frames, mirrors, etc.
and included the prices I paid at the thrift store
so you get an idea of how cheap making a wall like this really can be!}


The process is pretty self-explanatory but just in case:
I went to home depot and chose two bright, fun, cheery colors
and thought bright blue and sunshine yellow were gorgeous colors,
plus they match the beachy vibe I try to carry through our house.

I then laid down newspaper, spray painted some of the pieces I thought needed color
and let them sit out for a few hours before bringing them in and hanging them up.

That's it. You are ready to hang your beauties up!

I'm thinking in the near future I'll add
some of my art, an initial, more pictures of family,
and maybe some other fun thrifty finds.
This wall is our stairwell wall so it's HUGE.. We have lots of space to be filled!


There are so many ways to lay out the frames, mirrors, etc.
So my advice to you is have fun, do inventive things, get creative.
The silver mirror-backed candlestick holders that look pretty elegant in my pictures
were ol'-school southwestern decor and pretty hideous,
hubby thought I was crazy until he saw the final product.
So while you are shopping for your wall be imaginative,
some of the ugliest finds can be made gorgeous with just a can of paint.