November 19, 2014

Mini Key Lime Pies with Sugar Cookie Crust


Summer is over but that doesn't mean I can't hold on to the taste of it with an impressively delicious Key Lime Pie with a Sugar Cookie Crust recipe. This recipe packs an amazing amount of tartness with the lime while satisfying your taste buds with a super sweet cookie crust... all while being fairly healthy since there is only ONE added cup of sugar in the recipe total.


The creamy key lime pie filling matched with the Sugar cookie leave you craving more. If you are looking for something creamy and tart, a dish bound to WOW your guests, and lastly an easy recipe to make - I've got you covered. These Mini Key Lime Pies with Sugar Cookie Crust are sure to be a huge hit! 


If you don't like Key Lime, choose a different filler... I'm thinking about making a batch of these with raspberries or pumpkin instead, because why not? I suppose I should mention this recipe uses cashews so if you have a nut allergy, beware! 


Now let's get to the point and get baking and blending:
Mini Key Lime Pies with Sugar Cookie Crust

Sugar Cookie Crust Ingredients:

3/4 cup softened butter
1 cup sugar
2 eggs
1 tsp. vanilla
3 cups sifted flour
1 tsp. baking soda
1 tsp. baking powder
1 tsp. salt

Key Lime Pie Filling Ingredients:


1 cup raw cashews, soaked for 4-6 hours (or overnight), then drained
3/4 cup coconut milk, well shaken
1/4 cup coconut oil, melted
3-4 large limes or 6-7 key limes (1 Tbsp zest, 1/2 cup juice)
1/3 - 1/2 cup agave nectar (depending on preferred sweetness)


Begin by creaming together butter, sugar, eggs, vanilla.


Then stir in sifted flour, baking soda, baking powder, and salt.

Mix until dough is thick and looks like this:


Flatten a 1 inch ball of dough into silicone baking cups.


Bake at 375 for 10 minutes or until they begin just barely cracking on the top.

Press cookie/cupcakes down with a spoon, compressing them, and place in refrigerator to cool.

Combine & Blend Key Lime Pie filling ingredients in blender.


Pour Key Lime Pie filling into the silicone baking cups once the cookies have cooled and place in the freezer for 2-4 hours. Garnish with a tiny bit of lime.


Enjoy!


If you decide to make these delicious treats, be sure to come back and let me know what you think!

The LG OLED TV from Best Buy: The Ultimate Christmas Gift!

The reviewer has been compensated in the form of a Best Buy Gift Card and/or received the product/service at a reduced price or for free


The holidays are quickly approaching and I'm so excited to have teamed up with Best Buy. They have something for everyone on your list but today I'm going to tell you more about the Ultimate Christmas Gift, The LG OLED TV.


What exactly is The LG OLED TV?
The stunning design of LG OLED TV is only 0.21" thick at its thinnest point. The picture quality is spectacular, with Infinite Contrast that ranges from the most blazing whites to the deepest blacks. Plus, LG's exclusive 4 Color Pixel technology delivers bright, vibrant colors.  The best quality TV on the market, want to learn more? Check it out here: LGOLEDatBestbuy.com


As we all know, actions speak louder than words. The LG OLED is one of those sights you have to see to believe, with deeper and richer colors, stunning contrast and ingeniously curved screens, it is unlike any technology you've ever seen, and it delivers a picture that exceeds your wildest imagination! We've been TV shopping lately and this amazing piece of electronic gold is definitely on our list. Another feature that I'm totally in love with, the voice recognition remote. I know it sounds a bit lazy to be so excited about this but while painting or blogging, this would be so convenient! Everything from the WebOS to the vivid screen make this TV the top of the line and worth every penny.

This TV is the best gift for the tech lover in your life, with a $500 savings and a price tag at
$3499.99 you can't go wrong with this high-tech TV. You can do anything from browse netflix to blog on this gorgeous, super thin TV.

So now that you know more about the LG OLED what feature sounds the most appealing to you? Is there anything else you have your eye on at Best Buy?

November 17, 2014

DIY Pampering At Home Pedicure with Amopé Pedi Perfect and a Pineapple Coconut Soak

This shop has been compensated by Collective Bias, Inc. and its advertiser. All opinions are mine alone. #RespectUrFeet #CollectiveBias


I've always tried to pamper my feet and pedicures are probably one of my favorite activities, ever... and since I really don't like feet (I'm weird, I know), I feel like having pretty feet makes them a little less ugly and weird looking. Having dry or cracking feet is a big no-no in my book, cracked polish on your big toe - UH, no! Even though it's fall and we all plan on rocking boots and closed toed shoes, it's still important to have your feet looking good when the socks come off! Instead of hitting the salon weekly, I've finally found a new way to get my super pampering pedis in at home!


I found this little gadget at Target and I was so excited I headed home and decided it was time for a spa day immediately! I applied a face mask, got the polish out, poured some pineapple and coconut juice (not for drinking, read on for a super fun pedicure tip) and it's pedicure time!


I recently heard that pineapple is good for your nails; it sounds a little crazy, I know, but I did a little research and decided to start my pedi with a fabulous, all-natural pineapple, coconut soak. Pineapple stimulates the production of anti-inflammatory properties and contains chemicals that prevent tumors according to The Doctors; while coconut helps moisturize stubborn skin and it's anti-aging properties revitalize skin. Oh and did you know coconut milk can also serve as a make up remover, conditioner, and more?

So now that you know what this delicious smelling footie cocktail will do for you, it's time to mix it up and let your feet dive in.


Mix together 3 cups of Organic Pineapple Juice, around 1 1/2 cups coconut milk, and around 4-5 cups of hot (warm) water. Stir this mixture together inside a deep container and place your feet in the soak. I allowed my feet to soak for around 10 minutes, letting the pineapple soften my cuticles and brighten my nails while the coconut milk softened my skin. You will really notice a difference when removing your feet from the mixture.

After soaking, dry your feet with a towel and push back cuticles.


Next on the line up is the star of the show, the Amopé Pedi Perfect is what I use to buff the dry skin and callouses from my feet. This easy to use gadget is what makes my at home pedis so much better than one at the spa. I'm able to buff away the rough spots on my feet with the specially designed Micraumina head without it being painful or too aggressive. I'm obsessed with how soft and healthy my feet feel after use, especially after I applied the Amopé foot cream.


If you're looking for a way to spoil yourself or your closest gal pal, I highly suggest you #RespectUrFeet and pamper both of you with an Amopé Pedi Perfect. You can find this new at home pedicure gadget at Target in the foot care aisle. Plus right now through the 11/22 you can score a $5 gift card and 10% off using the Target Cartwheel app.


The last step in this super pampering pedicure is getting creative with polish! I decided to paint my toes with a super fun Fall inspired pedi and I'm sharing a simple tutorial on how I painted these super cool leaves onto my toesies. 


My Secret to The Perfect Bombshell Blow Out with Conair Curl Secret and Pro 3Q

This shop has been compensated by Collective Bias, Inc. and its advertiser. All opinions are mine alone. #CollectiveBias #HeartMyHair

I've always longed for the Perfect Bombshell Blow Out and with naturally curly hair, it's never been easy to achieve. I'm so excited to share that I have finally found the secret to the perfect bombshell blow out hairstyle everyday: the Infiniti Pro by Conair® Curl Secret® uses tourmaline-ceramic technology to help reduce the amount of frizz in your hair, while leaving you with super soft, touchable curls. This innovative tool is like nothing you have ever used before for your hair and the curls it makes are AMAZING!

Instead of keeping the Curl Secret to myself, I'm sharing it with the world. Take note, I found the Infiniti Pro by Conair® 3Q™ Brushless Motor Dryer and the Infiniti Pro by Conair® Curl Secret® at Wal-Mart...


Both of these items are this years hottest hairstyling products, in my opinion, and you can guarantee that The Curl Secret and Pro 3Q will be on every female's Christmas wish list!


Wondering how I achieved The Perfect Bombshell Blow Out? There's a technique necessary to achieve the perfect blow out and today I'm sharing my tips and tricks:

You'll want to begin by washing and using a deep conditioner, then towel dry your hair.
Begin an initial blow dry using your Pro 3Q, allowing your hair to become around 85% dry. Luckily with this dryer this process is quick and easy!

Now apply heat protection products, moisturizing products, and any other products you use regularly when applying heat to your hair.

Next you'll need to section off the top half of your hair and finish drying, using a round brush to help you shape and straighten your hair from the roots while providing volume without adding frizz!

Now that your hair is mostly straight, use the Velvet Paddle Brush to brush out tangles and turn on your Infiniti Pro by Conair® Curl Secret®. Now the real fun can begin!

You'll need to separate your hair into sections sized about 1-1 1/2 inches and allow the Curl Secret to draw your hair into it's chamber and wait for the "beep" indicating your hair is curled. This amazing hairstyling tool makes perfect, luxurious curls every single time! Continue curling over your entire head.

Once all of your hair is curled, brush your hands through. If you happen to have a clip run this through, breaking up the curls. This will help loosen your curls and give you more of the bombshell look over the Taylor Swift curls. I decided to go ahead and pin some of my bangs back with a bobby pin so I could really show off my curls.

Now finish with hairspray and your hairstyle is complete!


Do actions speak louder than words for you? Check out my quick tutorial on how I use the
Infiniti Pro by Conair® 3Q™ Brushless Motor Dryer and the Infiniti Pro by Conair® Curl Secret® to get achieve the coveted Bombshell Blow Out look!


Stay Connected with Conair: Facebook | Youtube | Pinterest | Twitter

November 16, 2014

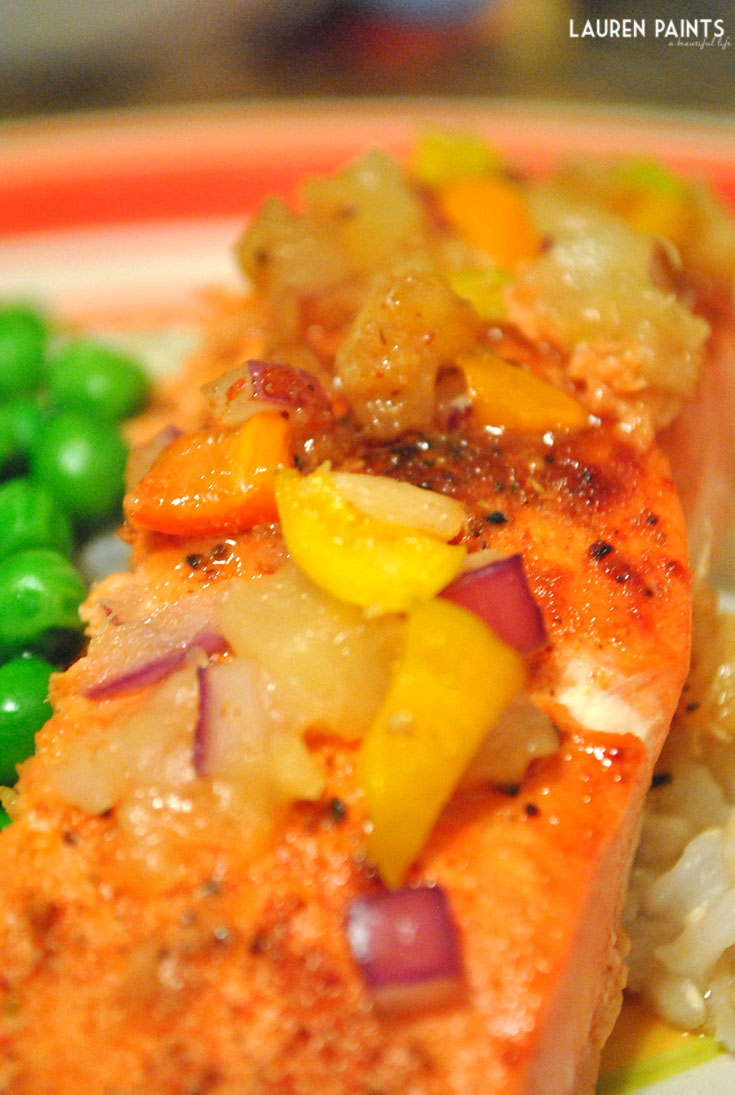
Sweet Hawaiian Pineapple & Pepper Salmon Recipe


This super delicious Salmon recipe packs a punch of flavors into a super sweet and savory meal. If you are looking for a different fish recipe, that will thrill your taste buds then I highly suggest this Sweet Hawaiian Pineapple & Pepper Salmon. It's easy to make and when served with peas and coconut rice makes for a delicious meal.


Sweet Hawaiian Pineapple & Pepper Salmon Recipe

Ingredients:
4 salmon fillets (12 oz of salmon)
1 teaspoon paprika
1 teaspoon chili powder
1/2 teaspoon cumin
1/2 teaspoon garlic
1/2 teaspoon ground red pepper
1/4 can crushed or chopped pineapple
3 chopped baby sweet peppers
1/8 cup chopped red onion
1/8 cup pure maple syrup

Begin by pouring a small amount of pineapple juice and all of the spices over salmon in a baking pan and marinate.

After allowing to marinate for a small amount of time, put into oven and broil for approximately 4 minutes and remove from oven

Baste with the maple syrup and place back in the oven for approximately 1 minute.

Chop & mix pepper, onion, and pineapple together - creating the pineapple salsa.
Take back out and add a spoon full or more of the pineapple salsa to each fillet.
Put back in oven and broil for another 1-2 minutes.
Serve over rice (preferably coconut rice) and veggie of choice, add extra salsa if needed.


Enjoy!